Imagine stepping into your kitchen, the warm air filled with the inviting aroma of freshly baked bread. You may not realize it, but this simple act can evoke powerful feelings of nostalgia and comfort. Baking buns at home, especially without yeast, allows you to create something special that often brings people together. Whether you’re preparing a meal for your family or hosting friends, the soft, fluffy texture of these buns will surely delight everyone.
Why Homemade?
When you choose to make your own buns, you’re not just following a recipe; you’re crafting an experience. Measuring, mixing, and baking can be very soothing. Plus, you have full control over the ingredients, allowing you to cater to dietary preferences and restrictions. You can choose organic flour, add spices, or even experiment with alternative ingredients to create a unique flavor profile.
The Joy of Baking Without Yeast
One of the best parts about this homemade buns recipe without yeast is the speed and simplicity. You won’t need to wait for dough to rise, which can be a time-consuming process. Instead, you can whip up a batch of buns in less than an hour. This means you can enjoy freshly baked goodness even on your busiest days, making it a practical choice for anyone looking to add homemade touches to their meals.
Connecting Through Food
Food has a remarkable ability to connect us. Think back to times spent around the dinner table, sharing stories and laughter while enjoying warm, homemade buns. These moments become cherished memories, often passed down through generations. By baking your own buns, you’re not just making a dish; you’re creating a shared experience that enriches your relationships with those you care about.
Embrace the Process
As you embark on this baking journey, remember that the process is just as important as the final product. Take your time to savor each step, from mixing the ingredients to pulling your golden-brown buns from the oven. Allow yourself to enjoy the satisfying feeling of creating something from scratch. This homemade buns recipe without yeast is not just about the food; it’s about the joy of cooking and the love you put into your kitchen.
In the following sections, you’ll find everything you need to know to create your own soft and fluffy buns. From understanding the essential ingredients to mastering the baking techniques, you’ll be equipped to impress your family and friends with your culinary skills. So, let’s dive in and explore the delightful world of homemade baking!
Table of Contents
Key Ingredients for Soft & Fluffy Buns
Creating soft and fluffy homemade buns relies heavily on the choice and quality of your ingredients. Each component plays a vital role in achieving that perfect texture and flavor you desire. Let’s dive into the essential ingredients that will elevate your baking experience, ensuring your buns are not only delicious but also a delight to make.
Essential Ingredients Overview
| Ingredient | Purpose |
|---|---|
| All-purpose flour | Provides the structure and base |
| Baking powder | Acts as a leavening agent |
| Milk or yogurt | Adds moisture and richness |
| Butter or oil | Enhances flavor and texture |
| Sugar | Balances flavors and aids browning |
| Salt | Essential for flavor |
All-Purpose Flour: The Foundation
When it comes to your buns, all-purpose flour is the backbone. It gives your dough the necessary structure to rise while keeping it light and airy. You want to choose a high-quality flour that’s fresh and free from additives. If you’re looking for a healthier alternative, consider using whole wheat flour, which adds a nutty flavor and increases fiber content.
Baking Powder: The Secret to Lift
Baking powder is crucial in this no-yeast recipe. It acts as a leavening agent, creating the rise that makes your buns soft and fluffy. When mixed with your wet ingredients, it releases carbon dioxide, which helps the dough expand. Be sure to use a baking powder that is fresh to ensure optimal results. If you want to experiment, you can also try using baking soda along with an acid like yogurt for similar effects.
Dairy: Milk or Yogurt
Incorporating milk or yogurt into your dough not only adds moisture but also contributes to the overall richness of your buns. Milk lends a subtle sweetness and creaminess, while yogurt can introduce a slight tang, enhancing the flavor profile. If you prefer a dairy-free option, almond milk or coconut milk can work just as well, providing a unique twist to your buns.
Fats: Butter or Oil
The addition of fat, such as butter or oil, is essential for achieving that tender and fluffy texture. Butter adds a rich, buttery flavor that enhances the overall taste of your buns. If you’re looking for a lighter option, vegetable oil or even olive oil can be used. Each type of fat will impart its own unique flavor, so choose one that aligns with your personal preference.
Sweetness: Sugar
Sugar serves multiple purposes in your bun recipe. Not only does it add sweetness, but it also aids in browning, giving your buns that beautiful golden crust. Additionally, sugar helps to retain moisture, keeping your buns soft for longer. You can experiment with different types of sweeteners, such as honey or maple syrup, to add a distinct flavor.
Salt: The Flavor Enhancer
Finally, don’t overlook the importance of salt. While it may seem like a small ingredient, salt elevates the overall flavor of your buns and balances the sweetness. It also strengthens the gluten structure in the dough, contributing to a better texture. Use a fine sea salt for the best results, as it dissolves easily and distributes evenly throughout the dough.
Experimenting with Alternatives
As you gather your ingredients, consider your dietary preferences and any restrictions you may have. Gluten-free alternatives like almond flour or oat flour can be used, but you may need to adjust the ratios and add binding agents like xanthan gum. Additionally, for a dairy-free version, using plant-based milk and oils can yield equally satisfying results.
In summary, the key ingredients for your homemade buns without yeast are foundational for achieving the desired softness and fluffiness. By understanding the role each ingredient plays, you can confidently create delicious buns that will impress anyone fortunate enough to taste them. Now that you’re equipped with this knowledge, let’s move on to the steps for crafting your perfect batch!
Step-by-Step Instructions for Making Homemade Buns

Creating homemade buns without yeast is a rewarding experience that allows you to enjoy fresh, fluffy bread with minimal effort. With just a few ingredients and some simple steps, you can produce delightful buns that are perfect for any meal. Let’s break down the process into easy-to-follow instructions, ensuring you have all the guidance you need to succeed.
Step 1: Gather Your Ingredients
Before you start, ensure all your ingredients are prepared. This preparation will streamline the baking process and help you stay organized. Here’s a quick checklist:
- All-purpose flour (or your preferred alternative)
- Baking powder
- Salt
- Sugar
- Milk or yogurt (dairy or plant-based)
- Butter or oil
Step 2: Preheat Your Oven
Set your oven to 375°F (190°C). Preheating ensures that your buns bake evenly and rise properly. While the oven heats up, you can focus on mixing your dough.
Step 3: Mix the Dry Ingredients
In a big bowl, mix the following dry ingredients together:
- 2 cups all-purpose flour
- 2 tablespoons sugar
- 1 tablespoon baking powder
- ½ teaspoon salt
Use a whisk or fork to blend these ingredients well. This step is crucial as it ensures that the baking powder and salt are evenly distributed throughout the flour, leading to consistent results.
Step 4: Add the Wet Ingredients
Now, create a well in the center of your dry mixture and add the wet ingredients:
- ¾ cup milk or yogurt
- ¼ cup melted butter or oil
Gently mix the wet ingredients into the dry ingredients using a spatula or wooden spoon. Don’t overmix; just combine them until they are mixed. A few lumps are perfectly fine.
Step 5: Knead the Dough
When the dough forms, move it to a lightly floured surface. Knead the dough for about 1-2 minutes. This step helps develop the gluten, which contributes to the texture of your buns. Aim for a smooth and elastic feel, but avoid excessive kneading to keep the buns soft.
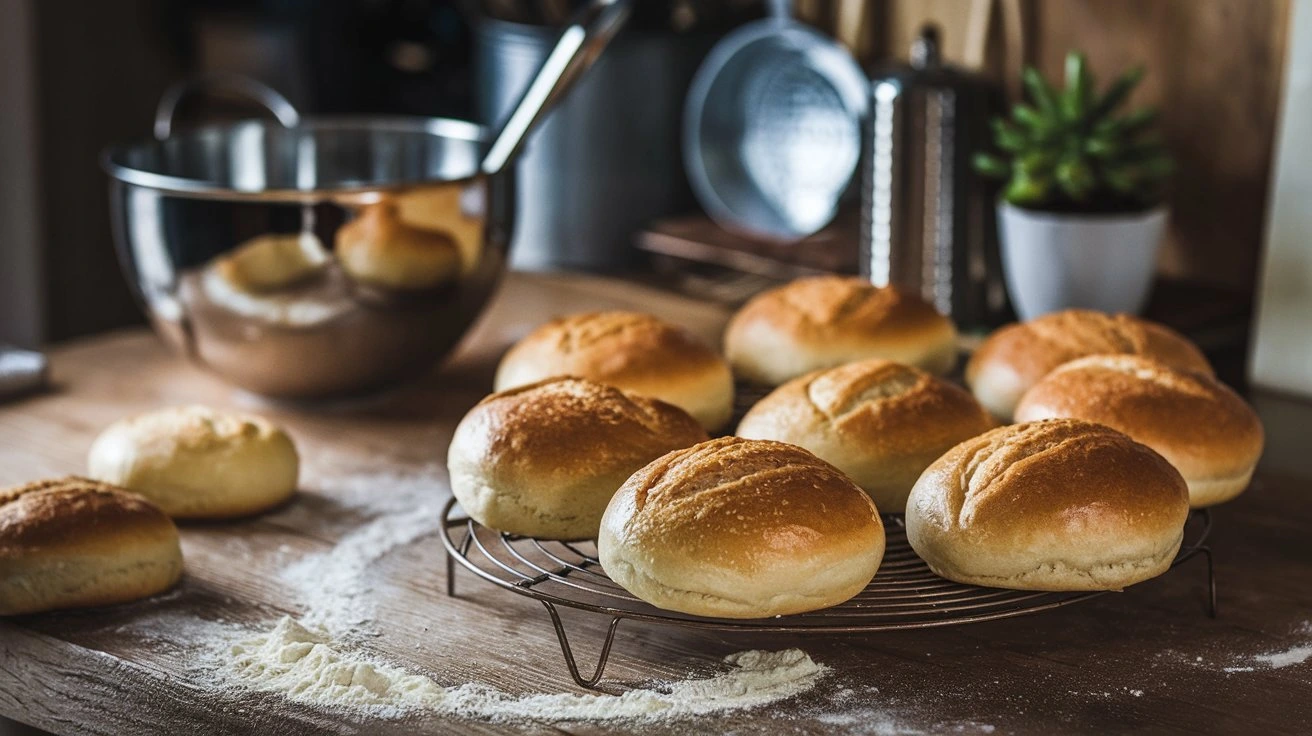
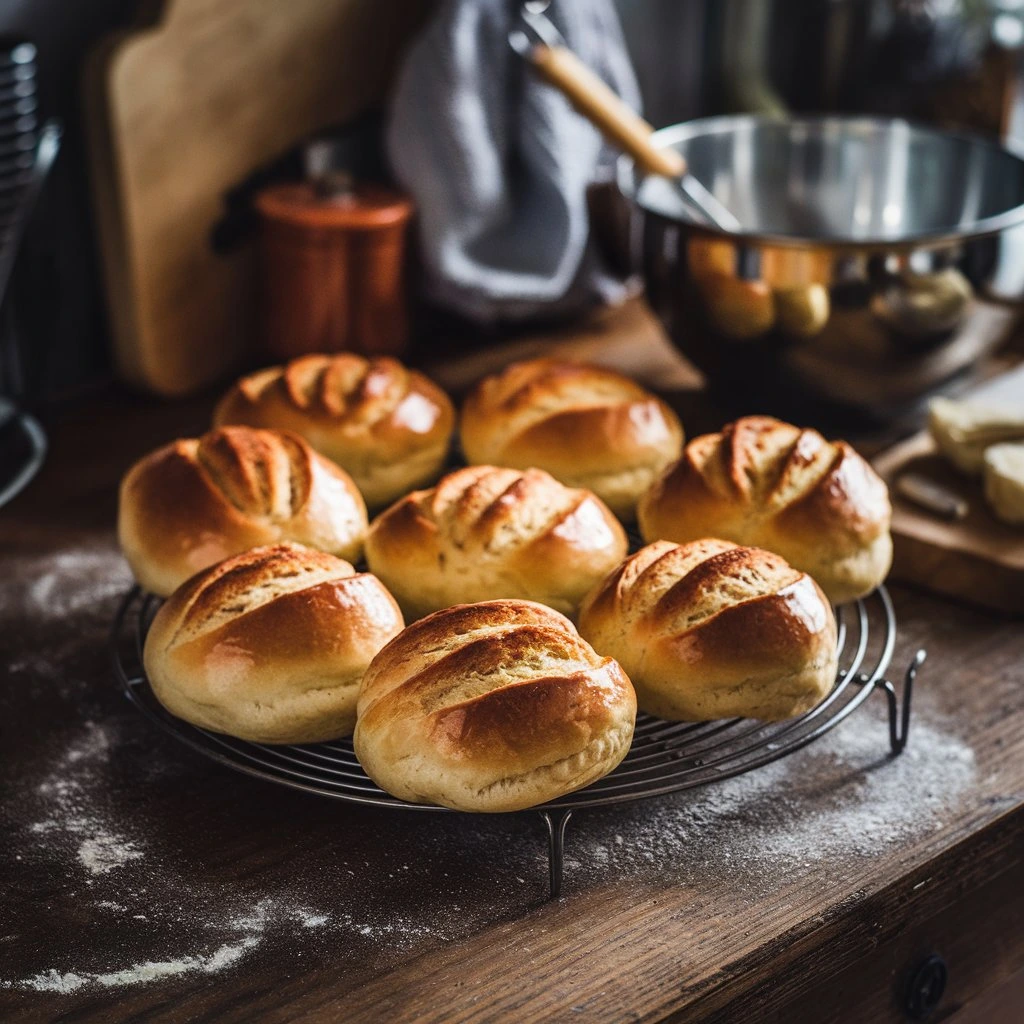
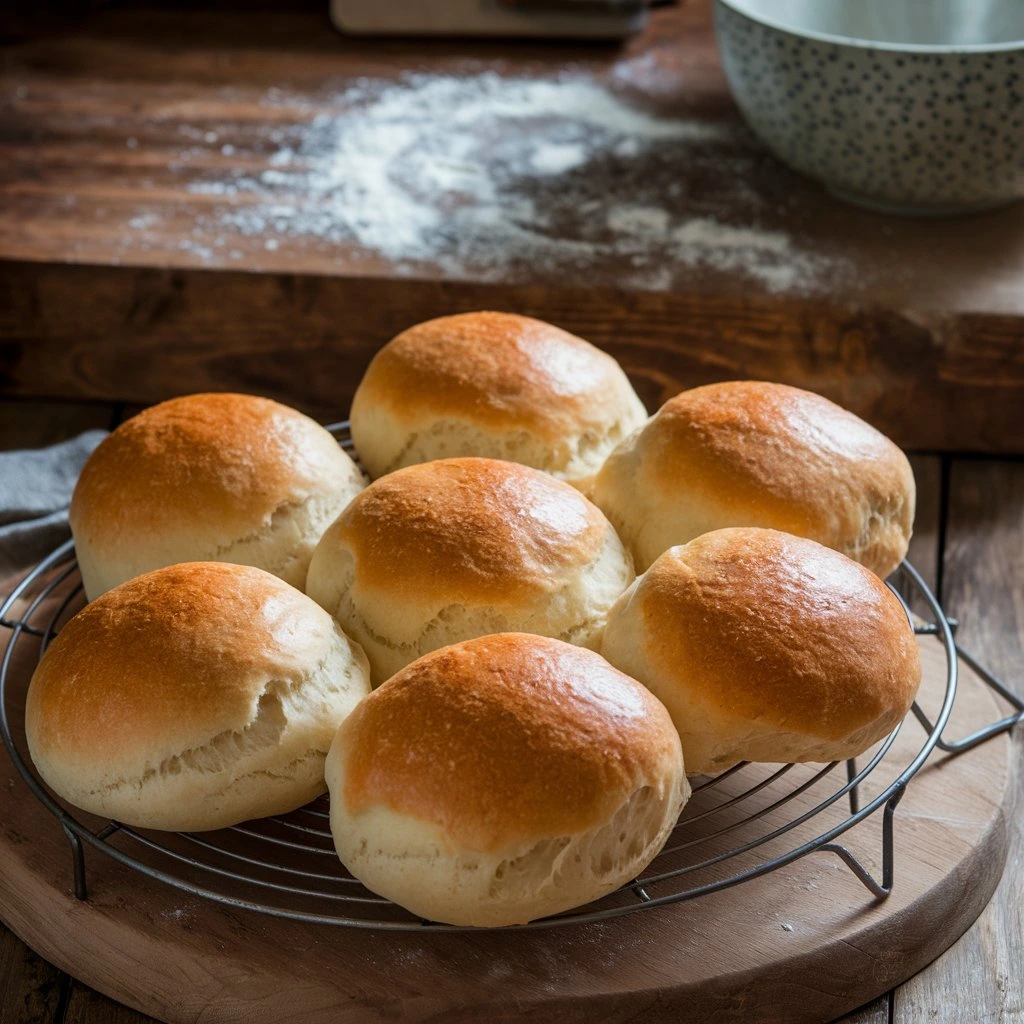
Step 6: Shape the Buns
Divide the dough into equal portions, depending on the size of buns you desire. For standard-sized buns, aim for about 8 equal pieces. Roll each piece into a ball, ensuring that the surface is smooth. Place the shaped buns on a baking sheet lined with parchment paper, leaving some space between each to allow for expansion during baking.
Step 7: Bake the Buns
Once your buns are arranged on the baking sheet, it’s time to bake! Place the sheet in the preheated oven and bake for 15-20 minutes, or until the tops are lightly golden brown. Watch them closely near the end of baking to avoid burning.
Step 8: Cool and Enjoy
After baking, remove the buns from the oven and let them cool on a wire rack for a few minutes. If you like, brush the tops with melted butter for added flavor and shine. These homemade buns can be enjoyed warm or at room temperature.
Tips for Success
- Experiment with Flavors: Feel free to add herbs, cheese, or spices to the dough for a unique twist.
- Check Doneness: If you’re unsure whether the buns are done, tap the bottom; they should sound hollow when fully baked.
- Storage: Store any leftover buns in an airtight container at room temperature for up to two days, or freeze them for longer storage.
By following these step-by-step instructions, you’ll find that making homemade buns without yeast is not only simple but also incredibly satisfying. With practice, you can refine your technique and adjust the recipe to suit your tastes. Now that you’ve mastered the basics, you’re ready to impress your family and friends with your baking skills!
Tips for Perfecting Your Homemade Buns
Baking homemade buns without yeast can be a delightful and rewarding experience, but achieving that perfect texture and flavor often requires a bit of finesse. Whether you’re a seasoned baker or trying this for the first time, these tips will help you refine your technique, ensuring your buns turn out soft, fluffy, and utterly delicious.
Understand Your Ingredients
- Choose Quality Flour:
- Opt for high-quality all-purpose flour or consider whole wheat flour for added nutrition. Fresh flour can make a significant difference in the texture of your buns.
- Check Baking Powder Freshness:
- Always ensure your baking powder is fresh. An expired leavening agent won’t provide the rise you need for fluffy buns. To test it, add a teaspoon of baking powder to a small amount of water; if it bubbles vigorously, it’s still good to use.
Master the Mixing Process
- Mixing Techniques:
- When combining wet and dry ingredients, use gentle folding motions instead of vigorous stirring. This helps maintain the lightness of the dough, contributing to a fluffy texture.
- Avoid Overmixing:
- Once the ingredients are combined, stop mixing as soon as there are no dry patches. Overmixing can lead to dense buns since it develops gluten too much.
Perfect Your Dough Consistency
- Dough Texture:
- Aim for a soft and slightly sticky dough. If it’s too dry, add a splash more milk or yogurt. Conversely, if it’s too wet, sprinkle in a little more flour until you reach the right consistency.
- Kneading Tips:
- Knead the dough gently for just a minute or two. You want it to be smooth but not overmixed. A light touch will keep the buns tender.
Shaping and Baking
- Uniform Size:
- When dividing the dough, try to make each piece the same size. This ensures even baking, so all your buns finish cooking at the same time.
- Spacing on the Baking Sheet:
- Make sure to leave space between the buns on the baking sheet. They will expand as they bake, and proper spacing helps them rise evenly without touching.
Baking Techniques
- Check the Oven Temperature:
- A kitchen thermometer can confirm your oven’s temperature. An inaccurate oven can lead to underbaked or overbaked buns.
- Use the Right Bakeware:
- A heavy-duty baking sheet or a cast-iron skillet can provide better heat retention, helping your buns develop a nice crust while staying soft inside.
Cooling and Storing
- Cooling Time:
- For longer storage, wrap them well in plastic and freeze. This prevents steam from making the bottoms soggy and keeps the texture light.
- Storage Tips:
- For storing, place the buns in an airtight container at room temperature for up to two days. For longer storage, wrap them tightly in plastic wrap and freeze. Thaw them at room temperature when you’re ready to enjoy.
Experiment with Flavors and Additions
- Add Ingredients for Variety:
- Consider incorporating herbs, cheese, or spices into your dough for added flavor. Ingredients like garlic powder or dried herbs can elevate your buns to the next level.
- Sweet Variations:
- If you want to make sweet buns, add a bit of cinnamon or nutmeg to the dough, and consider using honey or brown sugar instead of white sugar.
By implementing these tips, you can enhance your homemade buns and make them a standout feature at your dining table. With practice and creativity, you’ll find that perfecting your bun recipe is an enjoyable journey that leads to delicious results. So gather your ingredients, follow these guidelines, and prepare to impress everyone with your baking prowess!
Frequently Asked Questions
As you embark on your journey to make homemade buns without yeast, you may have some questions. This section addresses common queries to help you navigate the baking process with confidence. Understanding these aspects will not only enhance your baking skills but also ensure you achieve the best results possible.
How Can I Make These Buns Gluten-Free?
If you’re looking to create gluten-free buns, there are several flour alternatives you can use. Here are some tips:
- Flour Alternatives:
- Almond Flour: Offers a nutty flavor and moist texture. You may need to add a binding agent like xanthan gum to help the buns hold together.
- Oat Flour: Ground oats can create a soft texture, but make sure to use certified gluten-free oats if you have a gluten sensitivity.
- Gluten-Free All-Purpose Blend: Many brands offer blends that include a mix of various gluten-free flours, starches, and gums, providing a versatile option for baking.
Can I Freeze the Buns for Later Use?
Absolutely! Freezing your homemade buns is a great way to enjoy them later without sacrificing quality. Here’s how to do it effectively:
- Cooling: Allow the buns to cool completely on a wire rack.
- Wrapping: Wrap each bun individually in plastic wrap, then place them in a freezer-safe bag or container. This prevents freezer burn and helps maintain freshness.
- Thawing: When you’re ready to enjoy them, remove the buns from the freezer and let them thaw at room temperature. You can also warm them in the oven for a few minutes to refresh their texture.
What Can I Add to Enhance Flavor?
Adding ingredients to your dough can elevate the flavor profile of your buns significantly. Here are some ideas to consider:
- Herbs and Spices:
- Incorporate dried herbs like rosemary, thyme, or oregano for a savory twist.
- A pinch of garlic powder or onion powder can also add depth to the flavor.
- Cheese:
- Shredded cheese, like cheddar or mozzarella, can create a deliciously cheesy bun.
- Sweet Additions:
- For a sweet variation, consider mixing in chocolate chips, dried fruits, or a hint of cinnamon.
How Do I Know When the Buns Are Done Baking?
Perfectly baked buns should have a golden-brown color on top. Here are some additional tips to check for doneness:
- Hollow Sound:
- Tap the bottom of a bun gently; if it sounds hollow, it’s likely done.
- Internal Temperature:
- If you have a kitchen thermometer, the internal temperature should reach about 190°F (88°C).
Can I Use Other Liquids Besides Milk or Yogurt?
Yes, you can experiment with different liquids to create unique flavors in your buns:
- Plant-Based Milks:
- Almond milk, soy milk, or coconut milk can be substituted, adding their own distinct flavor.
- Broth:
- Using vegetable or chicken broth can lend an interesting savory note to your buns, making them perfect for sandwiches or savory dishes.
What If My Dough Is Too Sticky or Too Dry?
It’s common to adjust the dough consistency as you mix. Here are some quick fixes:
- Too Sticky:
- If your dough feels overly sticky, gradually sprinkle in more flour, a tablespoon at a time, until it reaches a manageable consistency.
- Too Dry:
- If the dough is crumbly or dry, add a bit more milk or yogurt, mixing until it comes together nicely.
By addressing these frequently asked questions, you can approach your baking with greater assurance and creativity. Remember, baking is as much about experimenting as it is about following recipes. With practice and a willingness to try new things, you’ll master the art of making delicious homemade buns without yeast!
Conclusion
As you reflect on your journey of making homemade buns without yeast, you may find that this process goes beyond simply baking; it’s about creating moments of joy and connection. Whether you’re preparing these soft, fluffy buns for a family dinner, a picnic, or just a cozy night in, you have the power to bring warmth and comfort to the table.
Embrace the Experience
Baking is about enjoying the process, not just the final result. From gathering your ingredients to the delightful aroma that fills your kitchen, every step is an opportunity to engage with the process. Embrace the creativity that comes with experimenting—whether it’s trying different flavors, textures, or ingredients. Each batch of buns is a chance to learn and improve your skills.
Share Your Creation
Once your buns are baked to perfection, don’t keep them to yourself! Share them with friends and family. Watch as they savor each bite and appreciate the love you’ve put into crafting homemade goodness. These moments of sharing food often lead to cherished memories and conversations that deepen your connections with others.
Keep Exploring
Now that you’ve mastered the basics of baking homemade buns without yeast, consider exploring more recipes. Try variations that incorporate different ingredients, or experiment with shapes and sizes. The world of baking is vast, and each recipe you tackle will enhance your confidence and understanding of the craft.
Final Thoughts
In conclusion, making homemade buns without yeast is a fulfilling endeavor that invites you to explore your culinary creativity. With the right ingredients and techniques, you can produce delicious results that bring happiness to your kitchen and beyond. So, roll up your sleeves, gather your ingredients, and let your baking adventure continue. Your journey into the world of homemade baking has just begun, and the possibilities are endless!