When it comes to comforting meals, few dishes can rival the warm embrace of baked ziti with ricotta. This classic Italian-American dish is not only a feast for the taste buds but also a canvas for creativity in the kitchen. Whether you’re preparing a simple weeknight dinner or hosting a gathering, baked ziti offers a delightful blend of flavors and textures that can satisfy even the heartiest appetites.
The Essence of Baked Ziti with Ricotta
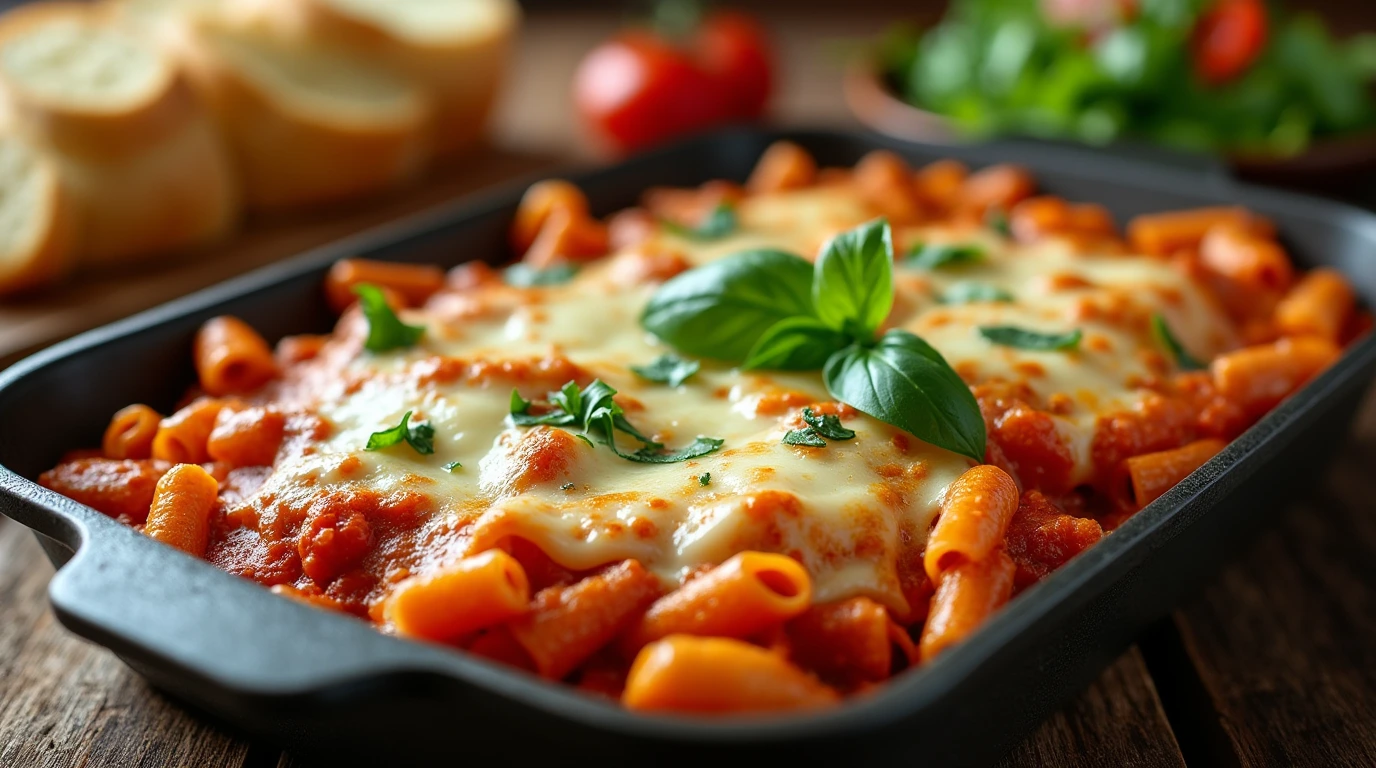
You might wonder what makes baked ziti so special. At its core, this dish combines the tender embrace of ziti pasta with rich tomato sauce, creamy ricotta, and gooey melted cheese. Each bite is a harmonious blend of flavors that brings together nostalgia and comfort.
Why You Should Make Baked Ziti
Here are a few reasons why baked ziti with ricotta deserves a spot on your dinner table:
- Versatility: This dish allows you to customize it to your liking. You can add vegetables, swap out cheeses, or even include different proteins.
- Ease of Preparation: With straightforward steps, you can prepare a delicious meal without spending hours in the kitchen.
- Make-Ahead Convenience: Baked ziti is perfect for meal prep. You can assemble it in advance and simply pop it in the oven when you’re ready to eat.
- Crowd-Pleaser: Whether you’re feeding a family or entertaining guests, this dish is sure to impress.
Engaging with Tradition
Making baked ziti with ricotta is more than just cooking; it’s about connecting with tradition. Many families have their own variations of this dish, often passed down through generations. By making it yourself, you’re not just creating a meal; you’re making memories.
The Journey Ahead
In this article, you will discover everything you need to know to master baked ziti. From gathering your ingredients to perfecting the baking process, we’ll guide you step-by-step. Each section will provide valuable insights and tips, ensuring that your baked ziti turns out perfectly every time.
So, roll up your sleeves, gather your ingredients, and prepare to embark on a culinary adventure that will fill your kitchen with delicious aromas and your heart with joy. Let’s dive into the world of baked ziti with ricotta!
Table of Contents
Ingredients for Baked Ziti with Ricotta

To create a mouthwatering baked ziti with ricotta, it’s crucial to gather the right ingredients. Each component plays a significant role in achieving that perfect balance of flavors and textures. Below, you’ll find a detailed list of essential ingredients, along with optional add-ins that can elevate your dish to the next level.
Essential Ingredients
| Ingredient | Amount | Description |
|---|---|---|
| Ziti Pasta | 12 oz (340 g) | The star of your dish; its tubular shape holds the sauce and cheese beautifully. |
| Ricotta Cheese | 15 oz (425 g) | Adds creaminess and a rich flavor that complements the other ingredients. |
| Mozzarella Cheese | 2 cups (200 g) shredded | Melts wonderfully, creating that gooey, cheesy top that everyone loves. |
| Marinara Sauce | 4 cups (960 ml) | Provides the flavorful base; you can use homemade or store-bought. |
| Parmesan Cheese | 1/2 cup (50 g) grated | Offers a salty, nutty flavor and adds a nice finish when sprinkled on top. |
| Egg | 1 large | Helps bind the ricotta cheese, giving the filling a creamy texture. |
| Italian Seasoning | 1 tsp | A blend of herbs that enhances the overall flavor profile of your dish. |
| Salt and Pepper | To taste | Essential for seasoning, balancing flavors, and enhancing the richness of the sauces. |
Optional Add-Ins
If you want to customize your baked ziti, consider adding one or more of the following ingredients:
- Ground Meat: Adding 1 lb of ground beef or Italian sausage can enhance the heartiness of your dish. Brown the meat before mixing it with the sauce.
- Vegetables: Incorporate sautéed vegetables like mushrooms, spinach, or bell peppers for added nutrition and flavor. They can also provide a lovely contrast in texture.
- Fresh Herbs: Garnishing with fresh basil or parsley before serving can brighten the dish and add a pop of color.
Tips for Selecting Ingredients
- Quality Matters: Opt for high-quality cheeses and sauces. The flavors of your baked ziti will reflect the quality of the ingredients you choose.
- Check Labels: If you’re using store-bought marinara sauce, check for added sugars or preservatives. A simple, natural sauce can make a significant difference.
- Freshness Counts: For herbs and vegetables, fresher ingredients will enhance the overall taste and presentation of your dish.
Conclusion
By carefully selecting your ingredients, you set the foundation for a delicious baked ziti with ricotta. Each element contributes to the dish’s overall success, ensuring that every bite is a delightful experience. So take your time, choose wisely, and get ready to create a meal that will be cherished by friends and family alike.
Step-by-Step Instructions
Creating baked ziti with ricotta is a straightforward process that allows you to enjoy the satisfaction of cooking while crafting a dish that’s sure to impress. By following these detailed steps, you’ll ensure that each layer is packed with flavor and that the final result is a bubbling, cheesy masterpiece. Let’s divide the process into easier steps.
1. Preparing the Pasta
The foundation of your baked ziti begins with perfectly cooked pasta. Here’s how to achieve that:
- Boil Water: Start by filling a large pot with water and adding a generous amount of salt. This step is essential, as it flavors the pasta during cooking.
- Cook the Ziti: Once the water reaches a rolling boil, add the ziti. Prepare it as the package says until it’s firm but tender. This means it should be firm to the bite, as it will continue cooking in the oven.
- Drain and Rinse: After cooking, drain the pasta in a colander. Rinsing it briefly with cold water helps stop the cooking process and prevents sticking. Place it in a big mixing bowl.
2. Making the Sauce
While the pasta cooks, you can make the sauce. This step adds rich flavor and depth to your baked ziti.
- Heat the Marinara: In a medium saucepan, pour in your marinara sauce and heat it over medium heat. Stir now and then to stop it from sticking and to heat evenly.
- Season the Sauce: As the sauce warms, add Italian seasoning, salt, and pepper to taste. This is your opportunity to customize the flavor, so feel free to adjust the seasonings based on your preferences.
3. Preparing the Ricotta Mixture
This creamy layer is what sets your baked ziti apart. Follow these steps to create a delicious ricotta mixture:
- Combine Ingredients: In a separate bowl, mix the ricotta cheese, egg, and a pinch of salt and pepper. Stir until well combined. The egg will help bind the mixture and give it a smooth texture.
- Add Cheese: Gently fold in half of the shredded mozzarella cheese into the ricotta mixture. This adds extra creaminess and flavor.
4. Assembling the Dish
Now comes the fun part—putting everything together! Follow these steps to layer your ingredients properly:
- Layer the Sauce: Begin by spreading a thin layer of marinara sauce at the bottom of a 9×13-inch baking dish. This keeps the pasta from sticking together and adds some moisture.
- Add the Pasta: Spoon half of the cooked ziti into the baking dish, spreading it evenly over the sauce.
- Spread the Ricotta Mixture: Carefully dollop the ricotta mixture over the pasta, using a spatula to gently spread it out. Aim for an even layer to ensure every bite has that creamy goodness.
- Repeat Layers: Pour another layer of marinara sauce over the ricotta, followed by the remaining ziti. Finish with another layer of sauce, ensuring that all pasta is covered.
- Top with Cheese: Add cheese by evenly spreading the leftover mozzarella and Parmesan on top. This will create a deliciously gooey and golden crust when baked.
5. Baking Your Baked Ziti
Now that everything is assembled, it’s time to bring your creation to life in the oven:
- Preheat the Oven: Heat the oven to 375°F (190°C) and let it warm up completely.
- Cover and Bake: Cover the baking dish with aluminum foil to retain moisture and prevent the cheese from over-browning. Bake for 25 minutes.
- Uncover and Finish Baking: After 25 minutes, carefully remove the foil and bake for an additional 15 minutes, allowing the cheese to melt and bubble to perfection.
- Let it Rest: Once out of the oven, let the baked ziti rest for about 10 minutes. Let it rest so the layers firm up, making it simpler to cut and serve.
Conclusion
By following these detailed steps, you’ll be well on your way to crafting a delicious baked ziti with ricotta that’s both comforting and satisfying. Each layer, from the pasta to the rich sauce and creamy cheese, comes together to create a dish that’s not just a meal, but a delightful experience. So, gather your ingredients, follow these instructions, and enjoy the process of bringing this classic dish to your table!
Tips for the Best Baked Ziti


To ensure your baked ziti with ricotta turns out perfectly every time, consider these valuable tips. Each suggestion is designed to enhance the flavors, textures, and overall experience of this beloved dish. By implementing these strategies, you’ll elevate your cooking and impress everyone at the table.
1. Choose the Right Cheese
Cheese is a key component of baked ziti, and the right selection can make all the difference.
- Mix It Up: While ricotta and mozzarella are the classics, don’t hesitate to experiment with other varieties. Adding provolone or fontina brings new tastes and textures.
- Use Fresh Cheese: Whenever possible, opt for fresh, high-quality cheeses. They melt better and provide a creamier consistency that enhances the overall dish.
2. Perfect Your Sauce
The sauce is the main part of your baked ziti. Here’s how to make it shine:
- Homemade vs. Store-Bought: While store-bought marinara can be a time-saver, a homemade sauce often has richer flavors. Consider simmering your own sauce with fresh herbs, garlic, and onions for a more robust taste.
- Add Depth: Enhance your marinara by incorporating a splash of red wine or a teaspoon of sugar to balance the acidity. Fresh herbs like basil or oregano can also add a vibrant touch.
3. Cook Pasta Al Dente
Cooking your pasta correctly is crucial for achieving the ideal texture in baked ziti:
- Timing Matters: Boil the ziti for about 2 minutes less than the package instructions indicate. This ensures the pasta remains firm and doesn’t become mushy during baking.
- Rinse with Cold Water: After draining, give the pasta a quick rinse under cold water. This halts the cooking process and prevents it from sticking together.
4. Layer Wisely
The way you layer your ingredients can impact the final product significantly:
- Start with Sauce: Always begin with a layer of sauce in the baking dish. This not only prevents sticking but also promotes even moisture distribution throughout the pasta.
- Even Distribution: Ensure that each layer of ricotta, pasta, and sauce is evenly spread. This guarantees that everyone gets a taste of each component in every bite.
5. Don’t Skimp on Seasoning
Seasoning is key to a flavorful baked ziti:
- Taste as You Go: As you prepare the ricotta mixture and sauce, taste frequently. Adjust the seasoning with salt, pepper, and herbs to ensure a well-balanced flavor.
- Season Each Layer: Don’t forget to sprinkle seasoning between layers. This ensures that every component is flavorful and contributes to the overall taste.
6. Baking Tips
The baking process is where your baked ziti transforms into a delicious dish:
- Cover Initially: Cover the baking dish with foil for the first part of baking. This helps retain moisture and allows the dish to heat evenly.
- Uncover for the Finish: Remove the foil for the last 15 minutes to achieve a beautifully golden and bubbly cheese topping.
7. Let It Rest
After baking, patience pays off:
- Resting Time: Allow the baked ziti to sit for about 10 minutes before serving. This resting period helps the layers set, making it easier to cut and serve without losing structure.
Conclusion
By incorporating these tips into your cooking process, you’ll create a baked ziti with ricotta that is not only delicious but also memorable. Each step, from selecting quality ingredients to mastering the baking technique, contributes to a dish that warms hearts and brings people together. So, gather your ingredients, embrace these tips, and get ready to enjoy a delightful meal that will have everyone asking for seconds!
Common Mistakes to Avoid
When making baked ziti with ricotta, there are several pitfalls that can detract from your dish’s flavor and texture. By being aware of these common mistakes, you can ensure that your baked ziti is a resounding success. Below, we’ll explore these missteps and how to avoid them, allowing you to enjoy a perfect pasta dish every time.
1. Overcooking the Pasta
One of the most frequent errors is cooking the pasta for too long.
- Why It Matters: If you overcook the ziti, it will become mushy during baking, leading to a less appealing texture.
- Solution: Always cook the pasta al dente, which means it should still have a slight bite to it. This way, it will hold up during the baking process and absorb the flavors of the sauce without becoming overly soft.
2. Skipping the Seasoning
Neglecting to properly season your ingredients can result in a bland dish.
- Why It Matters: Baked ziti is layered with various components, and each layer needs adequate seasoning to enhance its flavor.
- Solution: Taste your ricotta mixture and sauce as you prepare them. Add salt, pepper, and herbs to ensure that every element contributes to a well-rounded flavor profile. Remember to season the pasta water as well!
3. Using Low-Quality Ingredients
The quality of your ingredients directly affects the final outcome of your baked ziti.
- Why It Matters: Using subpar cheese or sauce can lead to a lackluster dish that fails to impress.
- Solution: Invest in high-quality cheeses and sauces. Fresh, local ingredients often provide the best flavor. If using store-bought sauce, opt for brands that use simple, natural ingredients without added sugars or preservatives.
4. Improper Layering
How you layer your ingredients can significantly impact the dish’s overall texture and flavor.
- Why It Matters: If you don’t layer properly, some parts of your baked ziti may be dry while others are overly saucy.
- Solution: Begin with a layer of sauce at the bottom of the baking dish. Alternate between pasta, ricotta, and sauce, ensuring even distribution. This method guarantees that every bite is flavorful and moist.
5. Not Letting It Rest
Serving baked ziti immediately after baking can lead to a messy presentation.
- Why It Matters: If you cut into the dish right away, the layers may not hold together, making it difficult to serve and enjoy.
- Solution: Allow the baked ziti to rest for about 10 minutes after you take it out of the oven. This resting period helps the layers set, making it easier to slice into neat portions.
6. Skipping the Foil
Not covering your baking dish during the initial baking time can lead to certain issues.
- Why It Matters: Without foil, the top may brown too quickly, while the inside remains undercooked.
- Solution: Cover the baking dish with aluminum foil for the first half of the baking time. This keeps moisture in and allows for more even cooking. Remove the foil later to achieve that desired golden-brown topping.
7. Ignoring Personal Preferences
Every cook has their own tastes, and ignoring your preferences can lead to disappointment.
- Why It Matters: Just because a recipe suggests certain ingredients or amounts doesn’t mean they will align with your taste.
- Solution: Feel free to adjust ingredients based on what you enjoy. If you prefer more cheese or additional vegetables, go ahead and customize the dish to suit your palate.
Conclusion
By avoiding these common mistakes, you can create a baked ziti with ricotta that is not only delicious but also visually appealing. Pay attention to the cooking process, be mindful of your ingredients, and take the time to layer and rest your dish properly. With these tips in mind, you’ll be well on your way to mastering this classic recipe and delighting your family and friends with every serving!
Frequently Asked Questions (FAQs)
When it comes to preparing baked ziti with ricotta, you may have several questions about the process, ingredients, and variations. This section addresses some of the most common inquiries to help you navigate your cooking journey and ensure your dish turns out perfectly every time.
1. Can I prepare baked ziti in advance?
Absolutely! Making baked ziti ahead of time is a great way to save effort on busy days.
- How to Prepare: You can assemble the entire dish, then cover it tightly with foil or plastic wrap and refrigerate it for up to 24 hours before baking. You can also freeze it for as long as 3 months. Just be sure to thaw it in the refrigerator overnight before baking if it’s frozen.
- Baking Time Adjustments: If you choose to bake it straight from the fridge, you may need to extend the baking time slightly to ensure it heats through completely.
2. What Can I Substitute for Ricotta Cheese?
If you find yourself without ricotta or want to try something different, there are several suitable alternatives.
- Cottage Cheese: This is a popular substitute due to its similar texture. Mix it for a creamier texture if you like.
- Cream Cheese: For a richer flavor, you can use cream cheese, but consider thinning it with a bit of milk or cream.
- Vegan Options: If you’re looking for a dairy-free alternative, consider using tofu blended with nutritional yeast and a splash of lemon juice for tanginess.
3. How Do I Make Baked Ziti Vegetarian-Friendly?
Transforming your baked ziti into a vegetarian dish is quite simple and can be just as flavorful.
- Vegetable Add-Ins: Incorporate sautéed vegetables such as spinach, mushrooms, zucchini, or bell peppers. These not only add flavor but also boost the nutritional value.
- Beans or Lentils: Adding cooked beans or lentils can provide protein and texture, making the dish hearty and satisfying without meat.
4. Can I Freeze Leftovers?
Yes, baked ziti freezes remarkably well, making it a perfect option for meal prep!
- Freezing Tips: Allow the baked ziti to cool completely before transferring it to an airtight container or freezer-safe dish. If you freeze individual portions, it makes reheating even easier.
- Reheating Instructions: To reheat, thaw it overnight in the refrigerator, then bake at 350°F (175°C) until heated through. You may want to cover it with foil initially to prevent drying out.
5. How Do I Store Leftover Baked Ziti?
Proper storage is key to maintaining the quality of your baked ziti.
- Refrigeration: To store leftovers, keep them in a sealed container in the fridge for up to 3 days. This ensures the dish remains fresh and tasty.
- Reheating: When reheating, you can use the oven or microwave. If using the oven, cover with foil to keep moisture in and prevent the cheese from over-browning.
6. What Should I Serve with Baked Ziti?
Baked ziti is a complete meal on its own, but pairing it with complementary sides can enhance your dining experience.
- Salads: A fresh green salad with a tangy vinaigrette balances the richness of the ziti. Consider adding ingredients like cherry tomatoes, cucumbers, and olives for extra flavor.
- Garlic Bread: Serve with warm garlic bread or breadsticks for a delightful crunch that pairs well with the soft pasta.
- Roasted Vegetables: Roasted seasonal vegetables can add color and a healthy touch to your meal.
Conclusion
By addressing these frequently asked questions, you can feel more confident in your ability to prepare and enjoy baked ziti with ricotta. Whether you’re looking to make it ahead, adapt it to dietary preferences, or simply store leftovers, this section aims to provide the clarity you need. Embrace the cooking process, and enjoy the delicious results!
Conclusion
As you reflect on your culinary journey with baked ziti with ricotta, you may find that this dish is more than just a meal; it’s an opportunity to create moments filled with warmth and connection. Whether you’re serving it at a family gathering, a cozy dinner with friends, or simply enjoying a quiet night in, baked ziti offers a comforting experience that resonates with many.
Embracing the Cooking Process
Throughout this guide, you’ve learned about the essential ingredients, step-by-step instructions, and valuable tips to elevate your baked ziti. Remember, cooking is not just about following a recipe; it’s about expressing your creativity and adapting the dish to your tastes. Feel free to explore different cheeses, add vegetables, or experiment with spices to make the dish uniquely yours.
The Benefits of Homemade
Making baked ziti from scratch allows you to control the quality of ingredients and adjust flavors to suit your preferences. It’s a rewarding process that not only fills your home with delightful aromas but also results in a dish that’s far superior to any store-bought option. Plus, the satisfaction of serving a homemade meal is unmatched.
Building Memories
As you gather around the table to enjoy your baked ziti, take a moment to appreciate the experience. Food brings people together, and sharing a meal is a timeless tradition that fosters connection. Whether it’s laughter, stories, or simply enjoying each other’s company, these moments are what make cooking worthwhile.
Encouragement for Future Endeavors
Now that you have the knowledge and confidence to prepare baked ziti, don’t hesitate to explore other recipes and cuisines. Cooking is a journey, and each dish you create adds to your culinary repertoire. Consider trying variations of baked ziti, such as adding seasonal ingredients or experimenting with different sauces.
Final Thoughts
In summary, baked ziti with ricotta is not only a delicious dish but also a canvas for your creativity and a catalyst for cherished memories. Armed with the tips and techniques discussed, you’re well-equipped to create a baked ziti that will delight your family and friends. So, gather your ingredients, roll up your sleeves, and enjoy the process of making this comforting classic. Here’s to many delicious meals ahead!